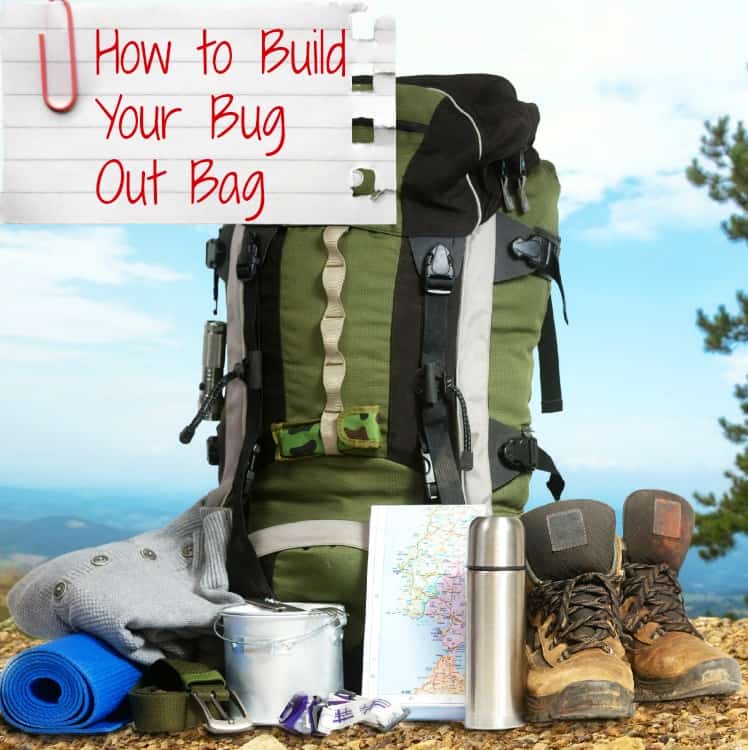
Building your bug out bag, or 72 hour bag can seem really overwhelming if you’re new to preparing for an emergency. Don’t get caught up in the thought that you need to have some tricked out, blingy bag. In reality, all you really need is a sturdy bag and a few supplies.
To start, you obviously need a bag. Choose a canvas bag over a plastic or vinyl one so that it will last longer. For size, go with a bag that you can comfortably carry on your back when it’s full. For kids, a regular backpack in a character that they like is best. In an emergency, kids need normalcy and a character they like is normal for them.
Build a Bug Out Bag
To start building your bug out bag, you’ll need to gather your supplies. Be sure that you have:
3 days clothing including socks
Water bottles for 3 days
Food for 3 days
Cash
Copies of your identification (both parents should also carry kids identification too)
Once you’ve got your items gathered, pack your bag. Try to keep the clothing that you include rolled up since it takes up less space in your bag that way. Pack everything so that it is secure and not going to roll around in your bag if you have to grab it quickly to get out of dodge.
Kid’s Bug Out Bags
For your kids, you’ll want to create a scaled-down version of your own bag. A child’s bag doesn’t need to be fully packed as yours does. Instead, you’ll want to give them only the basics they will need such as:
3 days clothing including socks
Snacks
Water (or juice – make sure if you do juice to include water as well and only pack 100% juice for less sugar content)
Sunscreen and Hat
Chapstick
Boredom Busters (crayons & coloring books, books to read, etc)
Copies of their birth certificate and social security card
Copies of important phone numbers
If you have an infant or toddler, be sure to add things like diapers, wipes, and creams to the bags you pack for them. Keep it light though since with a child that small, you would likely be grabbing it as well.
Building your bag out bags should only take you a few minutes. As you start to pack it, you’ll think of any other items that you might have missed that are not on this list.
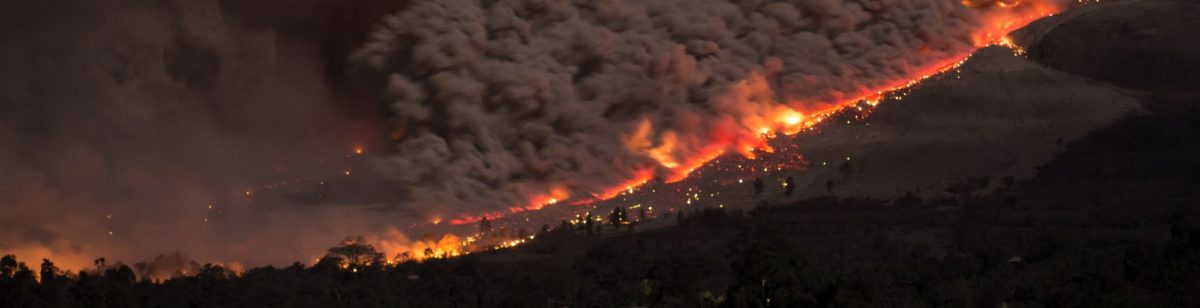
Be sure to rotate the food and any medications that are in the bag so that they don’t get expired. This all might seem a bit much for some, but during a fire, flood, or other situation where you have to run, it could save your life.
If you’ve planted a summer garden, you may be wondering how to preserve your harvest so that you can enjoy your harvest all year long. You can freeze your harvest, dehydrate them, or can them. It pays to think about supplies for canning before that time of the year hits so you are actually able to get what you will need.
If you’re new to canning foods, you may be unsure about which supplies you will really and truly need and which ones are extra. These 8 must-have supplies for canning your own food are where you will want to start.
Basic Supplies for Canning
Now, before you go down the rabbit hole and listen to what everyone on the different canning Facebook groups tell you that you need, just keep it simple. The only reason canning can be expensive is when you initially invest in your supplies.
Sure there are a ton of fun things to have, and specialized storage unit items for your finished goods, but we have a list of just 8 things that you really need to get the job done.
Pressure canner
When canning foods, there are two types of canners that you will need. The first is a pressure canner. As you begin looking for canning recipes, you will find that most canning recipes require pressure canning.
You can pick up a Presto 22qt canner for around $85.00 or you can go with a more expensive brand for $200+. When buying your canner though, make sure that you don’t opt for a smaller one. Those are pressure cookers and are not safe for home canning.
You optimally want to be able to put a double layer of jars in your canner for processing, so this is a great size.
Water bath canner
The other type of canner that you’ll need is a water bath canner (also called a boiling water canner). This type of canner is basically just a big pot with a lid and canning rack inside.
You can buy a complete water bath canning set for around $20.00. If you’re looking to can fruits or make jams and jellies, you’ll need to have this type.
Keep an eye out at garage sales and on your local Facebook by/sell groups and you might be able to pick one up for pennies. Mine is seriously the black speckled looking kind that Grandma used to have.
The technology on water bath canning really hasn’t changed much over the years.
Mason jars
I guess I should really say canning jars. There are a few different brands, like Ball, Kerr, etc.
You can’t can your food without Mason jars! You can buy them in a variety of sizes from 4oz on up. To decide how many you will need, figure out what you will be canning and how much.
Most people opt for pint and quart jars as their primary and use 4oz jelly jars as well. You can buy wide-mouth jars or regular mouth jars. Both kinds will can the exact same way.
I tend to use wide mouth jars for when I can meat or things like green beans. Small mouth are fine fro everything from soups to other veggies like corn or peas.
Canning Lids and Rings
Along with jars, you will need lids and rings as well for the next use of those jars you bought. Lids are a single-use-only item unless you use a brand like Tattler.
Make sure that you buy the ones that are correct for the jars that you have. Wide mouth lids won’t fit on regular-sized jars and vice versa.
If you are looking for metal lids, do NOT buy them on Amazon. Since the COVID-19 pandemic, a lot of forgeries have been shipped in the real-looking boxes. They don’t work and are a waste of your time.
Keep an eye out at your local Walmart, Hardware stores, and farm supply stores like Fleet Farm.
Canning Tool Kit
I found a kit on Amazon that has the following talked about tools. It was less expensive than buying them all separately. Check out the canning tool kit here.
Plastic tool for removing air bubbles
When you fill your jars, they will fill with air bubbles. These bubbles can cause your food to not seal correctly or to become contaminated so that they are no longer edible.
Using a metal tool to remove these air bubbles isn’t recommended. Instead, pick up a plastic tool made specifically for doing this task. They’re fairly cheap to buy and will save you a lot of heartbreak.
Canning funnel
Filling your canning jars, especially with liquids, can be hard to do without spoiling. A canning funnel will make things much easier for you.
Again, make sure that you have one on hand for the correct sized jar mouths or buy a combination funnel that will work for both.
Lid lifter
Your lids and rings need to be sterilized before they are used. To keep both you from getting burned and to keep them sterilized, you’ll need a lid lifter. This tool is incredibly simple, just a plastic stick with a magnet on the end, but you will need to have it on hand.
Jar lifter
When your jars come out of the canner, they will be extremely hot. You will need a way to get them out of the canner and a regular pot holder will not work.
For this, you’ll need a jar lifter. They’re only a few dollars but will save you burned hands and possibly dropped jars.
If you don’t want to purchase the smaller tools individually, you can usually purchase an entire canning set that includes them all. Getting them this way is a more cost-effective way of building up your canning supplies.
If you are looking for ideas on DIY home security that will give you comfort during times of emergencies or just everyday peace of mind here are some inexpensive ways to start.
It’s no secret that security is something we all want in our life. We want something to make our home feel more comfortable and safe; work to protect the items we work hard for and protect those that we love and cherish.
There are some security systems available that don’t cost an arm and a leg, however, those often come with a monthly fee for monitoring.
DIY Home Security Ideas for Preppers
Here are a few ideas on things you can do NOW that make a difference for your own safety. You might want to look into this more in depth as you feel concerns about things really starting to go over the tipping point for a SHTF situation and you know you will be sheltering in place.
You can have all the food, water, and medical supplies you want, but you need to keep them for yourself – not as fodder for the looters who may be desperate.
Home Security Signs:
One of the most simple and least expensive steps towards DIY home security is a home security sign. Some options would include; Nothing inside is worth dying for.
This gives intruders a warning there may be a gun waiting for them when they get inside. Other options include Beware of Dog signs and home alarm system signs.
Door Jams:
Installing a simple door jam to sliding glass doors will provide a delay if you are in the middle of a home invasion. You could also place a 2×4 between a door and a wall to deter a forced entry.
The nice thing about door jams is that there is no installation and they are small and discreet so no one will ever notice you have one.
Sliding Glass Doors:
Sliding glass doors are another thing – Why are Sliding Doors So Vulnerable? Sliding glass doors are use latches, not locks. That is why you see everyone put a “stick” in the track behind them when they are closed. Some sticks are wooden, some metal – those are referred to as “blocking bars”.
There are a few different things you can do to enhance that security:
The door is glass – right? What is to stop a desperate person from just grabbing a hammer or other similar tool and smashing through the glass? You can pick transparent or tinted film and now you can prevent burglars from making quick entry by breaking your door’s glass.
Protect your lifestyle from unwanted damages with Buydecorativefilm’s Clear Security and Safety 8 Mil S8MC window film. Its 8 mil thickness allows the film to serve as a protective layer once applied to your window.
The S8MC can absorb impact from break-in attempts and hold shattered glass together in case of breakage while remaining virtually clear and transparent so that you won’t even know it’s there.
Bonus perks? It will also help prevent breakage from flying debris as you get with a hurricane or tornado – within reason.
Install a Security Pin
This is hands down a very thrifty way to solve the problem – seriously, we found this great security pin on Amazon for under four bucks.
This locking pin is constructed from case-hardened steel and comes plated in chrome. The pin stores in its holder when unlocked and locks into the retaining ring when engaged. Securely locks your door in a closed or ventilating position.
With your sliding door securely closed, you simply drill a hole through the frame of the door that slides and into the frame of the stationary door. The pin will hold the two doors together and prevent them from being slid open.
One of the most simple and least expensive steps towards DIY home security is a home security sign. Some options would include; Nothing inside is worth dying for.
This gives intruders a warning there may be a gun waiting for them when they get inside. Other options include Beware of Dog signs and home alarm system signs.
The S8MC can absorb impact from break-in attempts and hold shattered glass together in case of breakage while remaining virtually clear and transparent so that you won’t even know it’s there.
Bonus perks? It will also help prevent breakage from flying debris as you get with a hurricane or tornado – within reason.
The pin does not screw or lock into the hole…it slides into three drilled holes through the decorative guide . Two holes are drilled through interior door frame. One hole is drilled on inside edge of exterior door frame.
Personal Protection:
Be sure you have something you can use as personal protection should a home invasion occur. If you are not keen on having guns around keep in mind there are many ways you can secure your guns so that they are safe, yet still accessible should the need arise where you need them.
I prefer the Secure It Gun Storage – and they currently have a great offer:
Secure It Gun Storage BUY NOW PAY LATER – No minimum spend is requiredApplies sitewide “4 Interest-Free Payments” Financing available upon approval Shop Now
WHY do I like them? Well – hubby is NOT a fan of a gun in the house. At. All. Contrasting that is me – a Desert Storm Vet who is used to handling a weapon. The compromise is secure storage so it is there if we need it, but not accessible to kids or visitors that don’t really know how to handle it.
ANY tool is a good tool for defense, if you know how to take care of it and store it properly.
It’s also a great idea to keep a can of mace and know how to use it.
Use Your Car Alarm:
This is a super simple technique but it will work. If you have a car with an alarm on it be sure to keep your key fob with you or on your nightstand. If your home is bring broken into hit the panic button on your key fob.
This will be very loud and bring attention to the area, likely sending the invaders on the run.
DIY Home Security System:
Last but not least is to think of purchasing a simple DIY home security system. There are some on the market that are simple to set up and you do not have to be under any contract for monitoring. These are great because they work just like those that are under monitoring contracts giving you peace of mind without the added cost if you are budget conscious.
A home invasion is very scary and I hope it’s something none of us ever have to face however taking a few simple DIY home security steps just may save your life and the lives of those you cherish most.
Natural Prepper Antibiotics? Since the beginning of time, it has been known that food has healing powers and strengthens the body’s immune functions. We all know that foods high in vitamins and minerals protect our body and helps prevent infection and disease.
When planning your stockpile for an emergency it’s so important to think of natural antibiotics you will need to help keep your body strong and free of sickness. It’s important to note that these items are healthy for you as part of an ongoing health regimen and not just for an emergency.
Natural Prepper Antibiotics
We all know that when the SHTF we most likely won’t be able to just call our family doctor and then waltz down to the pharmacy to pick up what was ordered for us. That is why we have to look at alternatives.
Apple Cider vinegar is a natural antibiotic and antiseptic, its also inexpensive so you can afford to stock up. It can be used to aid in the help of cholesterol, arthritis, skin disorders, clearing up sinuses, weight loss and much more.
Coconut Oil:
Coconut oil makes for wonderful Prepper Antibiotics and the best part is it can be used for cooking and provides a fast boost of energy. Coconut oil is best used on your skin because it has lauric acid in it and it’s the closest form of oil naturally made by your body.
It works to take the sting out of sunburns, alleviates itching from skin disorders, and helps to clear up acne.
Peppermint oil aids in digestive problems, freshens breath and is a natural pain relievers. Peppermint oil is antibacterial and helps get rid of lice and helps bruises heal more rapidly. You can also use it to help with colds and allergies by sniffing or applying a couple of drops under the nose.
Fish Antibiotics:
If you are in a situation where a doctor is not available, fish antibiotics are worth considering. Fish antibiotics are simply amoxicillin, that is prescribed for humans, it is hard to find however you can find it online.
Animal antibiotics are often safe for human consumption and great for preppers since they do not require a prescription. It can be used to treat any bacterial infection such as step throat, bronchitis, urinary tract infections, sinusitis, colds, and more. You will want to research dosing amounts for children and adults.
Activated charcoal is similar to grilling charcoal however it is oxygenated, which makes it safe for consumption. Hospitals often give patients with severe food poisoning and drug overdoes activated charcoal because traps toxins in the body and allows them to be flushed out without being absorbed into the body.
It’s important to take with lots of water so that it will flush the toxins from the system. Activated charcoal can be used for alleviating gas, treats alcohol poisoning and hangovers, emergency toxin removal, skin health, and reducing high cholesterol.
Tea Tree Oil is a very powerful immune stimulant and works to help fight bacteria and viruses, It can be used to treat fevers and kill bacteria in wounds. When applied topically it helps clear acne, heals skin infections, helps remove ticks, treats ringworm, psoriasis and helps soothe asthma symptoms.
Other options:
I know I mentioned fish antibiotics, here are a few more pet/vet gems you might want to stock up on.
All of the medications are on the WHO essential medications list. This is a list strictly for informational purposes, I not your doctor giving you a prescription.
Bacteria
Bacteria come in different forms that are susceptible or resistant to antibiotics based on if they are gram + or -. Due to this, in an SHTF scenario unless you have a microscope and gram stain you will not know what you have.
Examples of broad-spectrum: amoxicillin, imipenem, pipericillin, Levaquin, Cipro, moxifloxin, streptomycin, and tetracyclins.
Ciprofloxacin {Cipro}:
A good antibiotic for adults, not children. You have to go based on dose/kg dosing.
This is a very strong antibiotic. ls used for UTI, pneumonia, skin infection, bone/joint infection, sinus infection, plague, and anthrax. Cipro covers both gram + and – bacteria,
ln a survival situation, unless you have a microscope and the appropriate stains, you will not know what type you are dealing with. Do not take within 2 hours of calcium-based antacids.
Dosing: adult 500mg po q 12h, and the length of treatment depends on infection type, usually 7 days, with Anthrax being 60 days.
Metronidazole (Flagyl):
This is an antibiotic that is used for anaerobic bacteria, ameba, and protozoa. Metronidazole is primarily used to treat: bacterial, fungal, and protozoan infection: amoebiasis, giardiasis, trichomoniasis which are mostly Gl infections.
This is an important antibiotic due to the risk for c-diff and giardiasis which can cause severe diarrhea which can kill a person in a survival situation.
important to only use for conditions indicated because may be carcinogenic.
Dosing: tricomoniasis 500mg po bid x 7 days. For c-diff 250-500mg po qid x 10 days. For other infections: 500mg po tid x 7 days.
Cephalexin (Keflex):
This is an antibiotic that is effective against both gram-positive and gram-negative bacteria. lt is effective against middle ear infections, strep throat, bone and joint infections, pneumonia, skin infections, and urinary tract infections. This antibiotic can be used in pregnant women, children, and breastfeeding women.
–>lf person is allergic to penicillin should not use this medication.
Dosing: 500mg po bid x 7-10 days
Be careful playing doctor
When you are looking at medications that you are going to have in your go-bag or in your first aid kit, you have to take into account any allergies that people in your group may have. you also need to make sure that you are giving the correct dosage to the person.
Some of these medications come in powder form, and should only be used in an emergency due to having to calculate the appropriate amount. When giving medications, they are best taken on an empty stomach, but if stomach irritation occurs, you can take the medication with food. it may not be as effective.
Be very sure of your diagnosis:
When giving medication, you have to be careful to make sure that the person actually has a bacterial infection and not a virus, the medications will only work on bacterial infections.
Symptoms of bacterial infection are:
A fever of over 101 degrees, tachycardia, tachypnea, hypotension, weakness.
Symptoms of an Abdominal infection are:
Distension, tenderness, bloody stool, puss in stool.
This is a list of my favorite natural antibiotics and I am always looking for more. I would love to hear from you all, what naturals antibiotics do you recommend?
Other posts you may enjoy if you like our Prepper Antibiotics:
Have you ever heard of a bug-out location? If not, you might be surprised that people actually plan stuff like this. A bug-out location is a location, a house, a business, or a piece of property that your family can go to in case you can no longer stay at your home.
Your bug-out location should be someplace that you and your family feel safe. Whether you choose a friend’s house, a family member’s house, a 2nd home that you own, or even just an empty piece of property that you may own, you need to do two things.
What is a Bug out Location and Why Do You Need One?
First, get permission. Obviously, if you own your location, you can skip this step. If it’s someone else’s home or property, be sure to ask so there aren’t any issues. Next, you’ll need to make absolutely certain that your family knows where you’re going. If you and your teenage kids are separated, they won’t know where to head if they don’t.
So by now, I’m sure you’re asking why you need to have a bug-out location. The answer is easy.
Why set a bug-out location?
Without a second location for your family to go to, any emergency could separate you. If you have a fire and the family scatters, you have no way of making sure that everyone gets out.
If you have a flash flood and don’t meet up, you haven’t got a way to check. The same goes for winter weather. What if your husband is trapped in the ice and snow, but you’re at home?
With a bug-out location, you know exactly where he will head to; either home or your bug-out location, whichever he is closest to. Either way, you’ll know where to look for your family if they get separated.
Your bug-out location doesn’t need to be some out-of-the-way cabin in the woods (although it certainly can be if you want). The best location for you and your family is a place that everyone is comfortable with and knows how to get to.
Place Extra Supplies Along Your Bug Out Routes and Secondary Paths
A bug-out situation is an event that you hope never happens, but you do want to be prepared for. That means that you should plan for every contingency. That includes making sure that you have extra supplies hidden along with your bug-out route as well as along secondary paths.
The benefits of a cache
Having a cache means hiding supplies or anything else that you think you might need in case something happens to the supplies you already have. In the blink of an eye, you can lose important supplies or even everything if you’re ambushed or you have to flee from an animal attack.
Without supplies, your odds of surviving diminish. Most preppers understand that a cache is a plan B in case plan A gets derailed. It’s also something handy to have in case you run into a situation where you use up your supplies faster than you estimated that you would.
Hide your cache well
You need to make sure that your cache is well hidden and protected by the elements. That means you have to use the right container to keep your cache safe. You can use plastic piping for this purpose.
You use wide plastic piping, fill it with some extra supplies, then cap it off. You can also use any storage box that’s waterproof and rust-proof. Put whatever you think might come in handy in the container, then seal it up.
Be thrifty with your cache
To save on costs, some preppers will take those large water containers and load those with items like extra first aid materials or survival supplies like water sanitation methods and extra ammo.
You can also use small or large storage bins, but you need to make sure that you find a hiding place above ground since storage bins can break down when stored underground.
Protect your supplies
Whatever material you choose to use for your cache, you want to make sure that it offers as much protection for your supplies as you can get. You want whatever you choose to be able to withstand temperature changes as well as rain.
What to store
Some preppers store basic things in a cache like extra clothes, shoes, weapons, tools, a way to create a shelter, and other items needed to survive for a few days. Others hide canned food and water alone – or these items in addition to extra supplies like maps, knives, or paracord.
Map it out
You’ll want to keep in mind when hiding a cache that the area where you place the storage container can change over time. What looks one way will look different three months down the road.
That’s why you need to create a document where you list where you’ve hidden your cache or caches. By hiding a cache or two, you’re taking extra steps to make sure you’re protected.
These tips should help you not only figure out a bug-out location for your family, but stock things up along your route to make the emergency situation a little smoother.
How to Prepare Your Family For a Flood? If you live in a flood plain, it makes sense to prepare your family for the potential of a flood. Floods can be extremely damaging and deadly if you’re not careful.
Just ask the people who live in parts of Texas and Louisiana right now. Making sure that your family is as best prepared as they can be maybe one of the most important things you can do for them. Take a look at these 15 tips to prepare for a flood:
Steps to Prepare for a Flood
These steps are a combination of things you can do way in advance and as soon as you get the flash flood warning.
Before the Flood: Prepare Your Family For a Flood
Flood Insurance
Most people who live in a flood plain know that you need to have flood insurance, but if you don’t? Get it today. Flood insurance is not available through your insurance company and instead is offered by the government at a very affordable price.
This is certainly the number one item on your list if you live in an area that has been known to flood. If the worst case scenario hits, you will be protected.
Prevent water from entering your home
If you are expecting heavy rains or storms to hit your locality, particularly if you live in a flood-prone area, you should cover your doors, or even windows, with metal sheets, sandbags, or plywood. You can also use silicone sealant to ensure that water will not enter your home.
Some of these things you should have on hand, especially if you live in a flood-prone area.
Shut off your utilities
You should remember to turn off all your utilities, such as gas, electricity and even water, at the mains. You should also remember to unplug all your electrical appliances and store them at high places, on the second floor, if possible.
Be mindful of your appliances and furniture
You need to ensure that your furniture and appliances are kept in high areas or upstairs. If you do not have a second floor, you can just raise such items on blocks or bricks. Be sure to remove carpets, curtains, and even internal doors. Store them all in high places to ensure that they are protected from water.
Fire safe box
I realize that a fire-safe box is for fires, but most of the good quality ones are also somewhat watertight. Keep certified copies of your important documents and flash drives with your family photos inside of them just in case you lose your other copies. It may not protect them.
Important papers, pictures, and other personal items really should be placed on higher ground, particularly on the second floor of your house. If not, you should put important papers on sealed bags to ensure that they are protected from the impending deluge.
72 Hour Bag
If you live on a flood plain, you may very well have to evacuate quickly. Having a well stocked 72 hour bag is a MUST! Your bag needs to include 3 days change of clothing, quick food, water, medicines, personal documents (certified copies), cash, debit or credit cards, and anything else you might think you need. Too many people have been left with nothing because of a rising flash flood to skip this step.
Check the perimeter
Make sure that all objects outside your house, such as rakes, are kept in a safe place. Floodwater can easily float these items, which can pose danger to others.
Raft or canoe
I know it may seem excessive, however, in a flash flood, you may not be able to get your car out of the driveway (or even get to your car for that matter). Having something you can paddle out in could save your life in case the water rises too quickly.
Lifejackets
Along with the raft or canoe, you need to be sure that you have a lifejacket for every single member of your family. If something would happen and they couldn’t get out of the water, they would at least be covered that way. It really could be the difference between life and death for them.
Use the Top shelf
The words top shelf doesn’t apply just to liquor. Keep your important documents and a few days of food and water on a top shelf for storage in case of rapidly rising water.
Also look for anything that is poisonous. We tend to keep those items under our kitchen sink, but we certainly don’t want those toxins getting into the water, should it enter your home. If you have pets? It would be a death sentence.
During the Flood: Prepare Your Family For a Flood
Use a weather radio
Information is crucial during situations like these so a hand-crank weather radio is a must-have. Thus, you need to always listen to the radio for announcements and updates. Be sure to cooperate fully with local authorities and emergency services. If they require you to evacuate, follow them and do not dillydally.
Burn Daylight
Since electricity will almost certainly be unavailable, you must ensure that you do all the things you need to do during the day. It is much more difficult and unsafe to do things in the dark.
Stay Inside
Just because you made sure all sharp implements were pretty much nailed down, it doesn’t mean that all your neighbors did the same thing. Be sure to stay inside your house. There may be objects floating in the water, so do not attempt to swim through it.
Floodwater can kill, especially when it is raging, so do not attempt to go out. It is important to note that rapid-flowing water that is six inches high could make you fall, while two feet of water could make your car float. You can either be swept away or be knocked over by objects that are in the water.
Avoid the Water
Floodwater may be dirty and contaminated with sewage, so you should avoid contact if possible. It would be a shame that you survived the flooding but fell ill because of contaminated water.
Keep off the roads
River bridges, sea defenses, and riverbanks are very dangerous places to be in during floods, so be sure to steer away from them if possible. There have been many cases wherein floodwater has destroyed or collapsed bridges and defenses.
These 15 tips aren’t complicated to do at all, but they could not only help you save your precious documents but your life as well. If you live in an area that has flooded in the past, you can bet that it will again at some point. It may not be tomorrow, but it will happen eventually. Making sure you’re prepared for that possibility isn’t a bad thing. It’s just plain smart.
Strong tropical storms and hurricanes often cause flooding, even in areas that are not prone to such an event. With the extreme weather conditions that we are facing today, everybody should be prepared for anything, particularly flooding.